
How Long Should DIY Sparkling Water Rest?
20 lb CO₂ Economics and a Mass-Loss Test
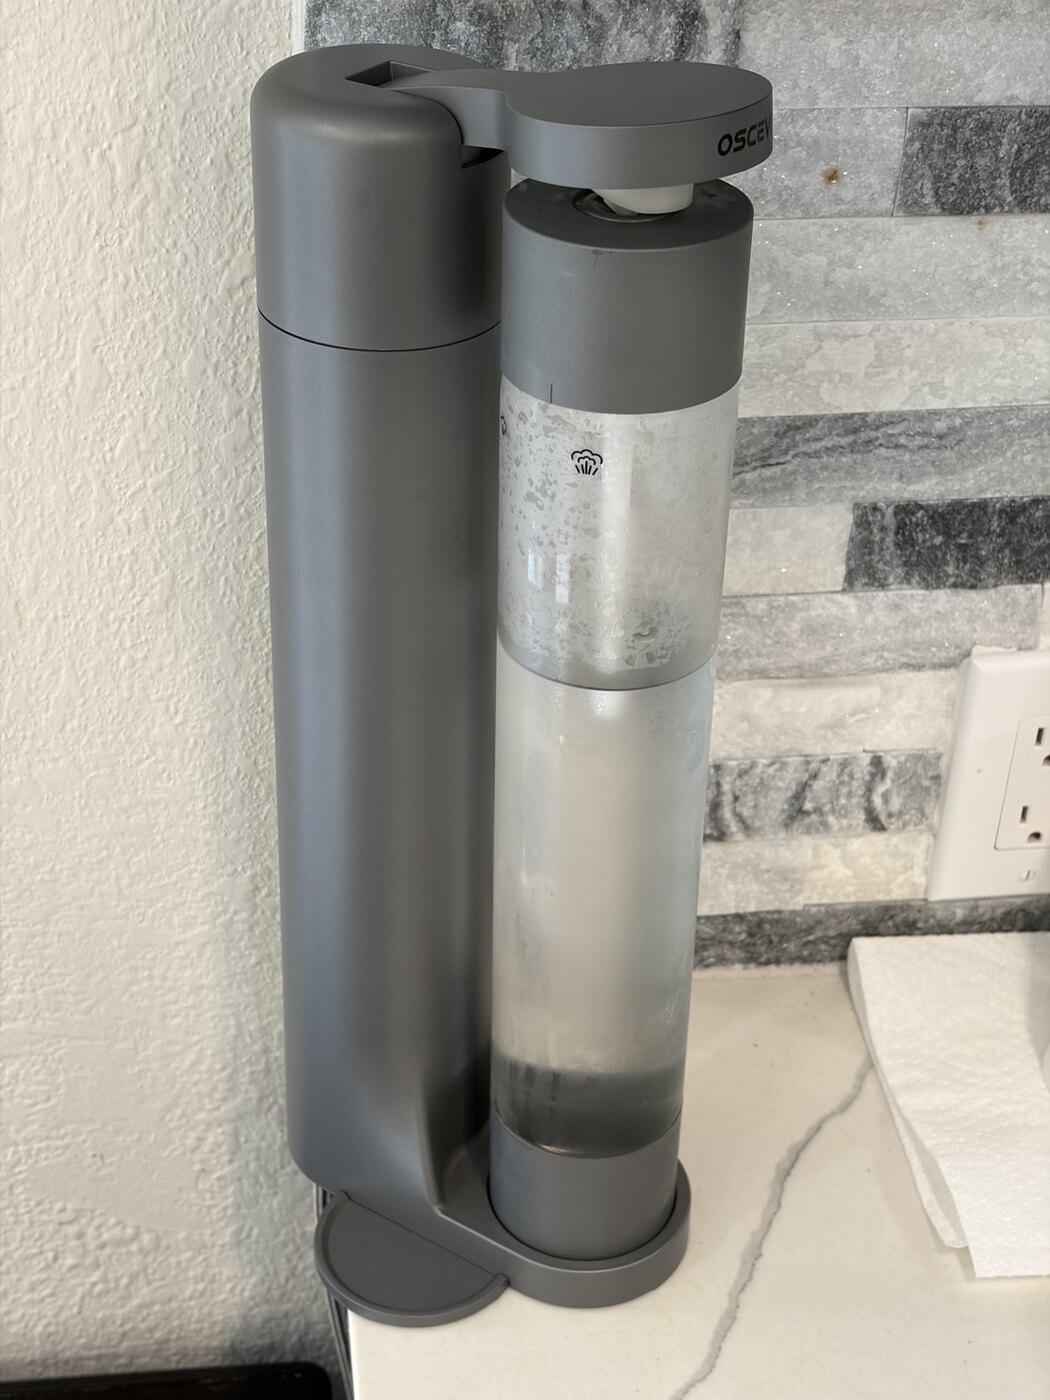
I drink enough sparkling water that I moved away from small CO₂ cylinders and built around a 20 lb (9.1 kg) CO₂ tank. The running cost dropped dramatically, but the setup created a more interesting question: after injecting CO₂, how long should the bottle stay pressurized before opening? I tested 1 minute, 15 minutes, 80 minutes and overnight, then tracked the result with video, audio and a 0.1 g kitchen scale. In this setup, 15 minutes was still early. The effective time constant was about 74 minutes, making roughly four hours (~3τ) a useful practical target. I also compared the finished DIY water with Topo Chico, both plain and in a highball.
Quick takeaways
| Is 20 lb CO₂ economical? | For the CO₂-supply side, my used 20 lb tank + full CO₂ + hose + adapter cost $197.87. About 20 lb of CO₂ through SodaStream's 410 g cylinders, starting with one $31.99 spare and then using $16.99 one-time exchanges, works out to about $390.93. That is about 49% less for the first 20 lb-equivalent on my setup. [1][2] |
|---|---|
| What about the next refill? | My local 20 lb refill at Carbonics is $43. The same CO₂ mass at SodaStream's $16.99 one-time exchange price is about $375.93, or about an 8.7× difference in CO₂ cost. [1][3] |
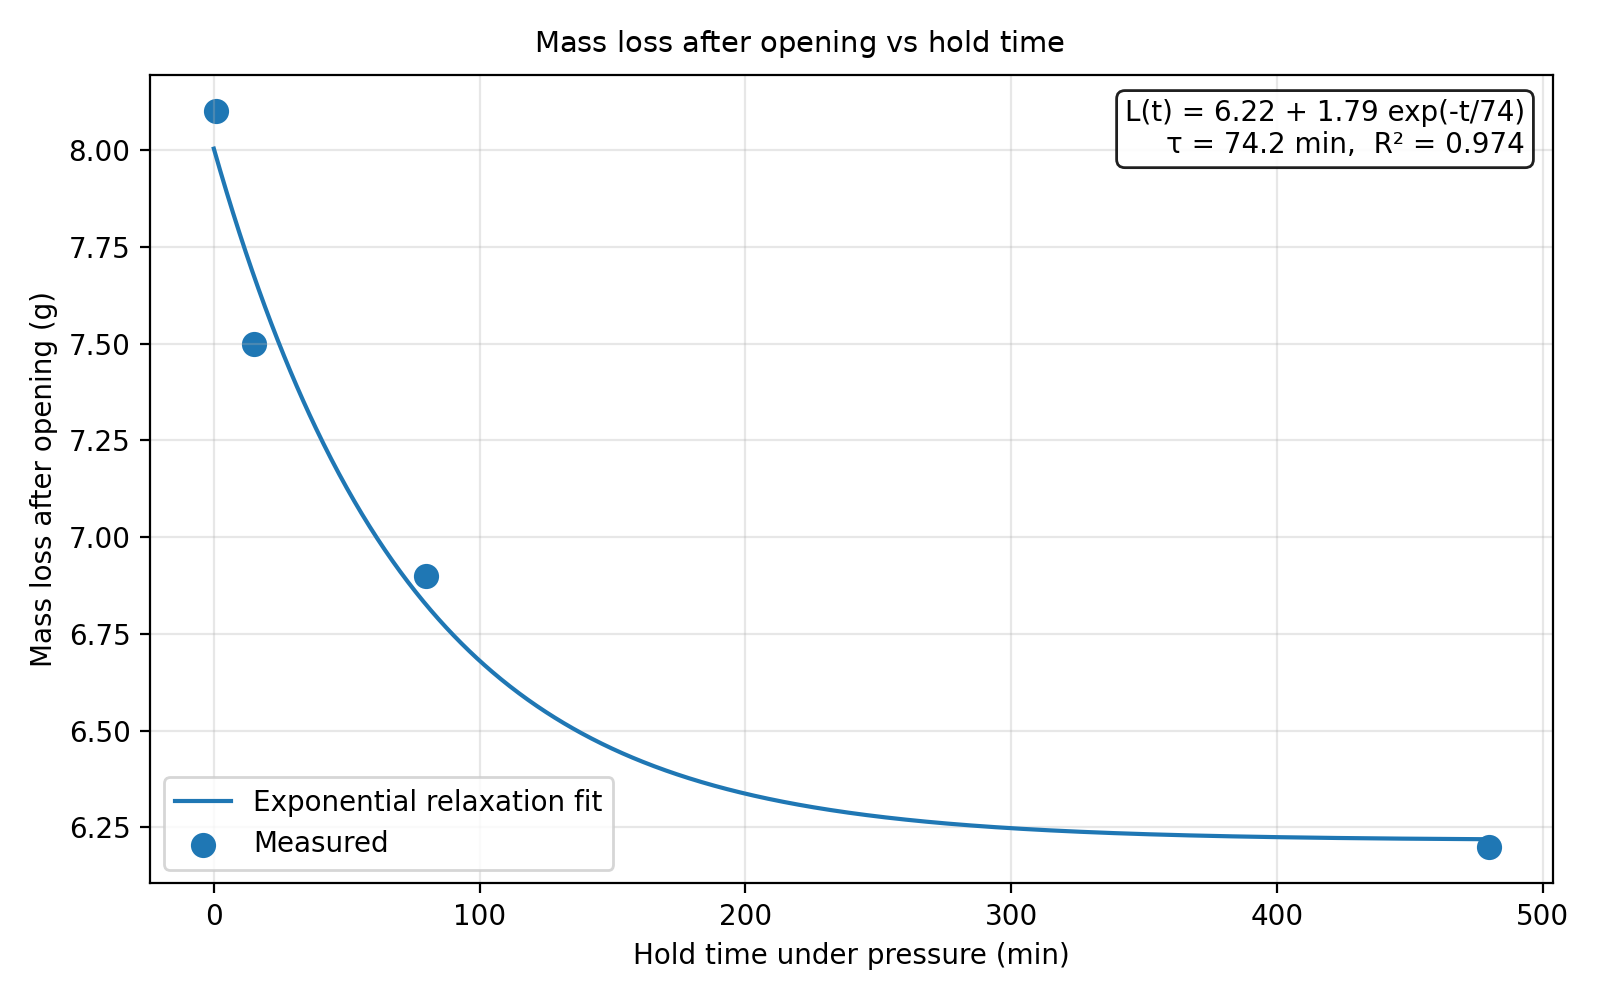
| How long did I rest it? | With 800 mL (27 fl oz) held at 0°C (32°F), total mass loss after opening was 8.1 g at 1 min / 7.5 g at 15 min / 6.9 g at 80 min / 6.2 g at 8 h. |
| Time model | An exponential-relaxation fit gave τ≈74 min, R²≈0.974. The transient is ~86% complete at 2τ and ~95% at 3τ≈3.7 h. My practical answer is about four hours; overnight is the easy option. |
| Topo Chico tasting | DIY tasted stronger and sharper; Topo Chico had finer, smoother bubbles and a mellower profile. In a highball the carbonation strength was similar, and I preferred the DIY water with the whisky. |
Hardware used | My 20 lb CO₂ setup
- OSCEVIA Sparkling Water Maker — $62.69 when I bought it. Amazon product page →
- Conversion adapter (ASIN B0DP4JW39X) — $12.99 when purchased. Amazon product page →
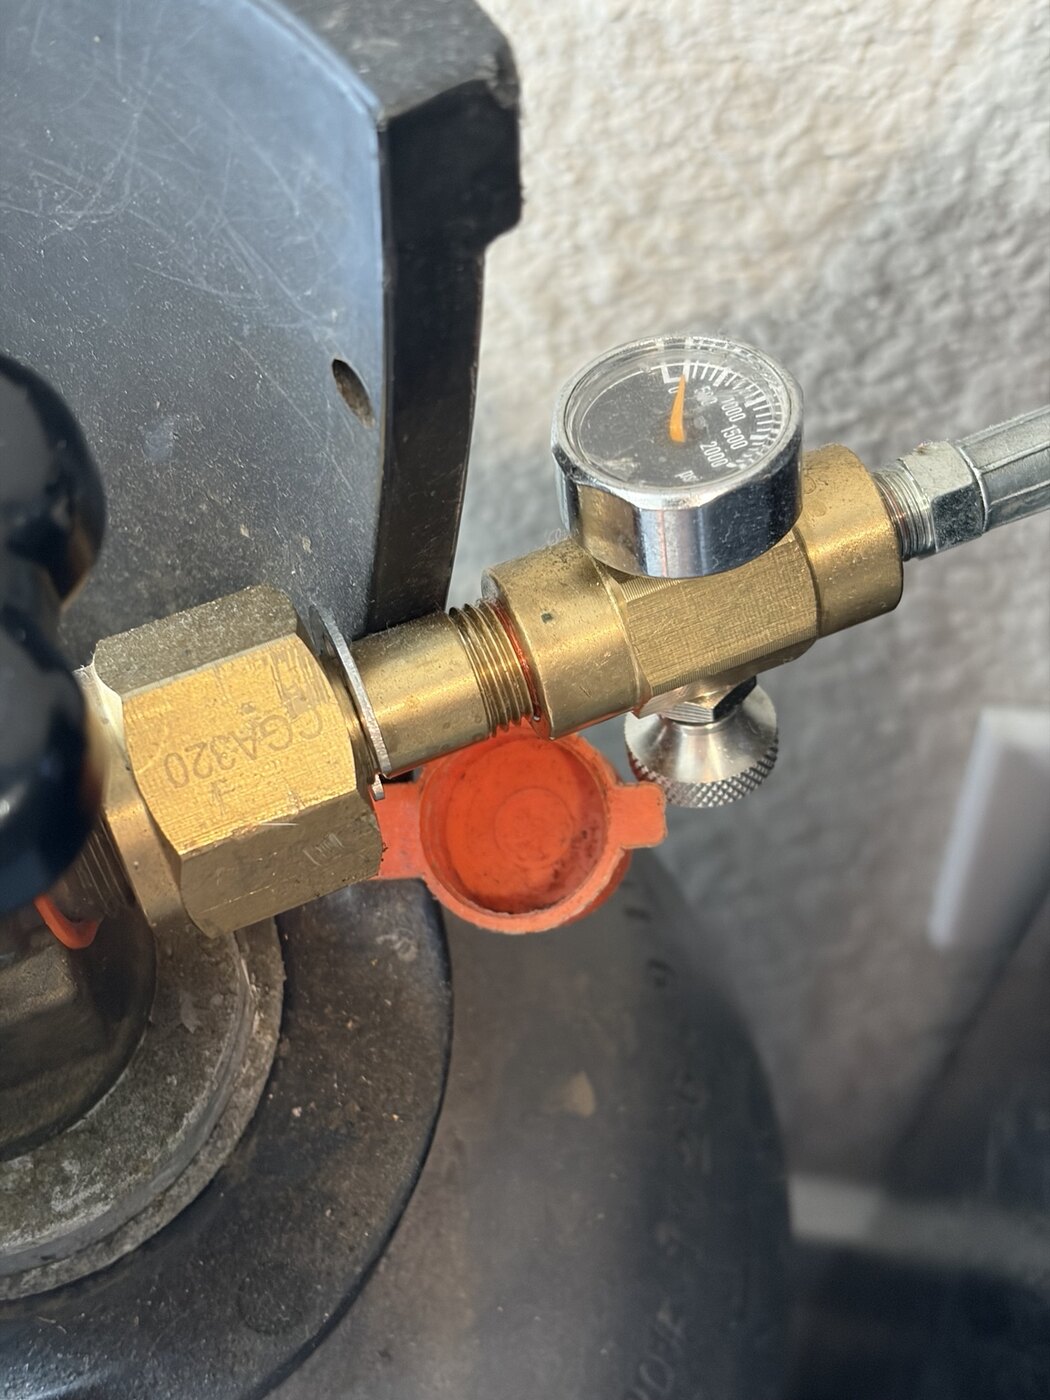
- FIDEURSUS CGA320 adapter hose kit / pressure gauge — $39.88 when purchased. Amazon product page →
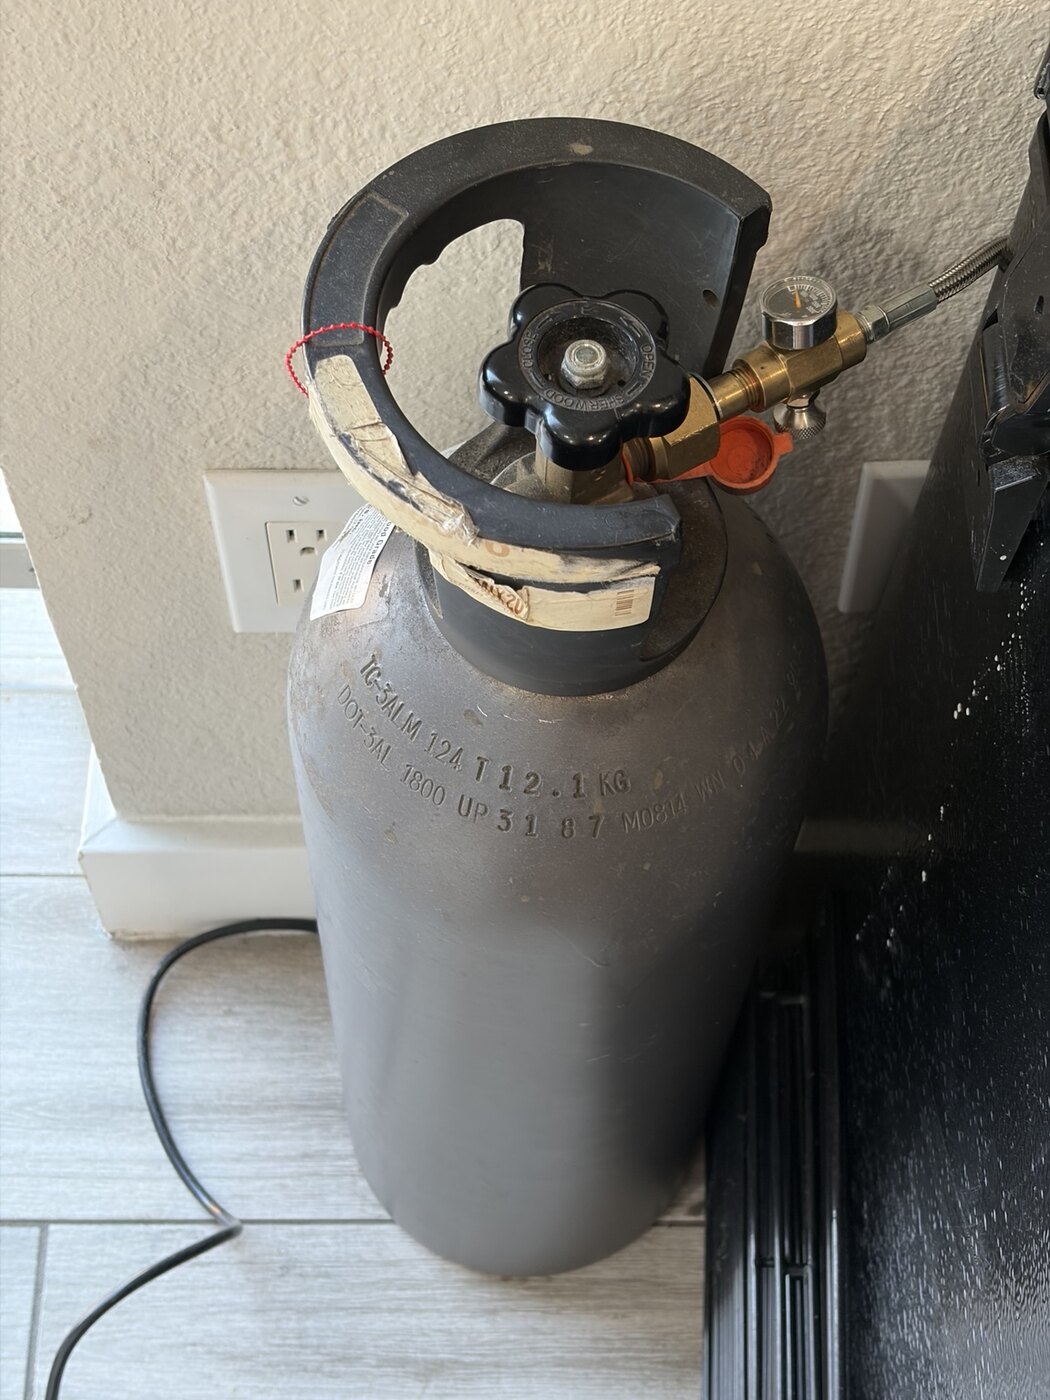
- 20 lb CO₂ tank — mine was a used local tank from Carbonics, filled for $145. New-tank reference: Victory 20 lb CGA320 tank →
- CO₂ refill — $43 for 20 lb at Carbonics in my actual visit. Carbonics →
Prices above are what I paid, not guaranteed current prices. High-pressure CO₂ requires appropriate rated hardware, a secured upright cylinder, leak checks, food-grade gas for beverage use, and following the instructions for every component.
1. Economics first: even the first tank-full worked out cheaper
The original reason for moving to a 20 lb tank was simple: if you drink a lot of sparkling water, the small-cylinder exchanges add up. Here is what I actually paid for the CO₂-supply side of the setup.
| 20 lb side | Price paid | Purpose |
|---|---|---|
| Used 20 lb CO₂ tank + full CO₂ charge | $145.00 | Bought locally at Carbonics. |
| 60-inch CGA320 hose + pressure gauge | $39.88 | Connects the large cylinder to the soda-maker side; originally bought for a SodaStream setup. |
| Conversion adapter | $12.99 | Used in the current connection stack. |
| Initial CO₂-supply total | $197.87 | Carbonator body excluded |
SodaStream's U.S. site currently lists a 60 L spare cylinder at $31.99 and a one-time exchange at $16.99 (checked October 8, 2026). A 60 L cylinder contains about 410 g (14.5 oz) of CO₂. [1][2]
A 20 lb cylinder holds about 9,072 g of CO₂, or about 22.13 SodaStream fills. Buying the first cylinder and then exchanging it enough times to reach the same CO₂ mass gives:
$31.99 + (22.13 − 1) × $16.99 ≈ $390.93
tank + fill + hose + adapter
one spare + exchanges
before tax/shipping
$43 vs. ~$375.93
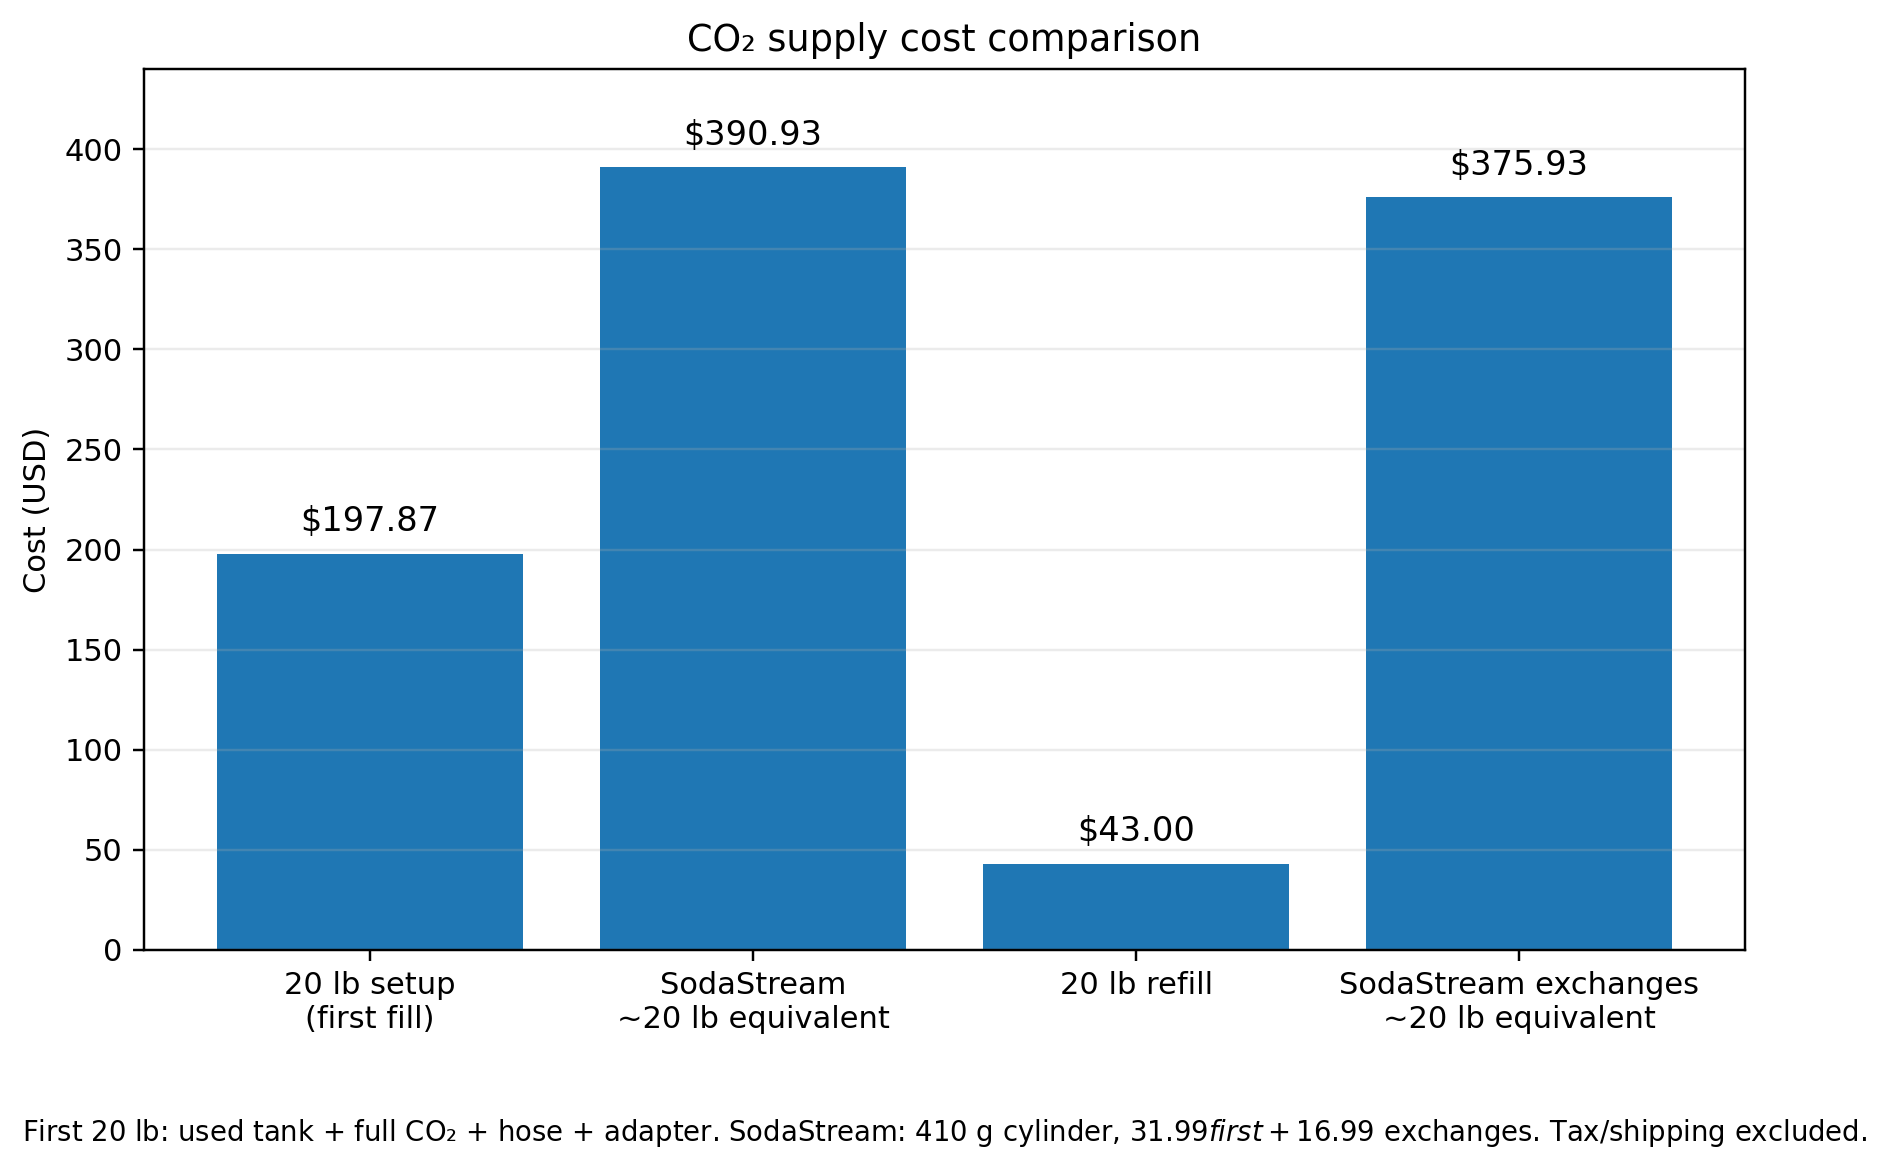
Once the tank is owned, my actual local refill is $43 for 20 lb. Carbonics advertises in-person CO₂ cylinder refills, including 20 lb sizes, and says it uses high-grade food-quality CO₂ suitable for soda and beer. [3]
This is a CO₂-supply comparison, not a full soda-maker price comparison. Machine prices vary, so I excluded the carbonator body from both sides. My carbonator itself cost $62.69, putting my actual all-in initial system at $260.56. SodaStream also offers subscription pricing from $14.99 per cylinder. Even at that rate, the first 20 lb-equivalent is about $348.68 and subsequent 20 lb-equivalent CO₂ is about $331.68, still above my $197.87 / $43 large-tank costs. [1]
On a rough 700 L real-world basis, the gap vs. store-bought water gets even bigger
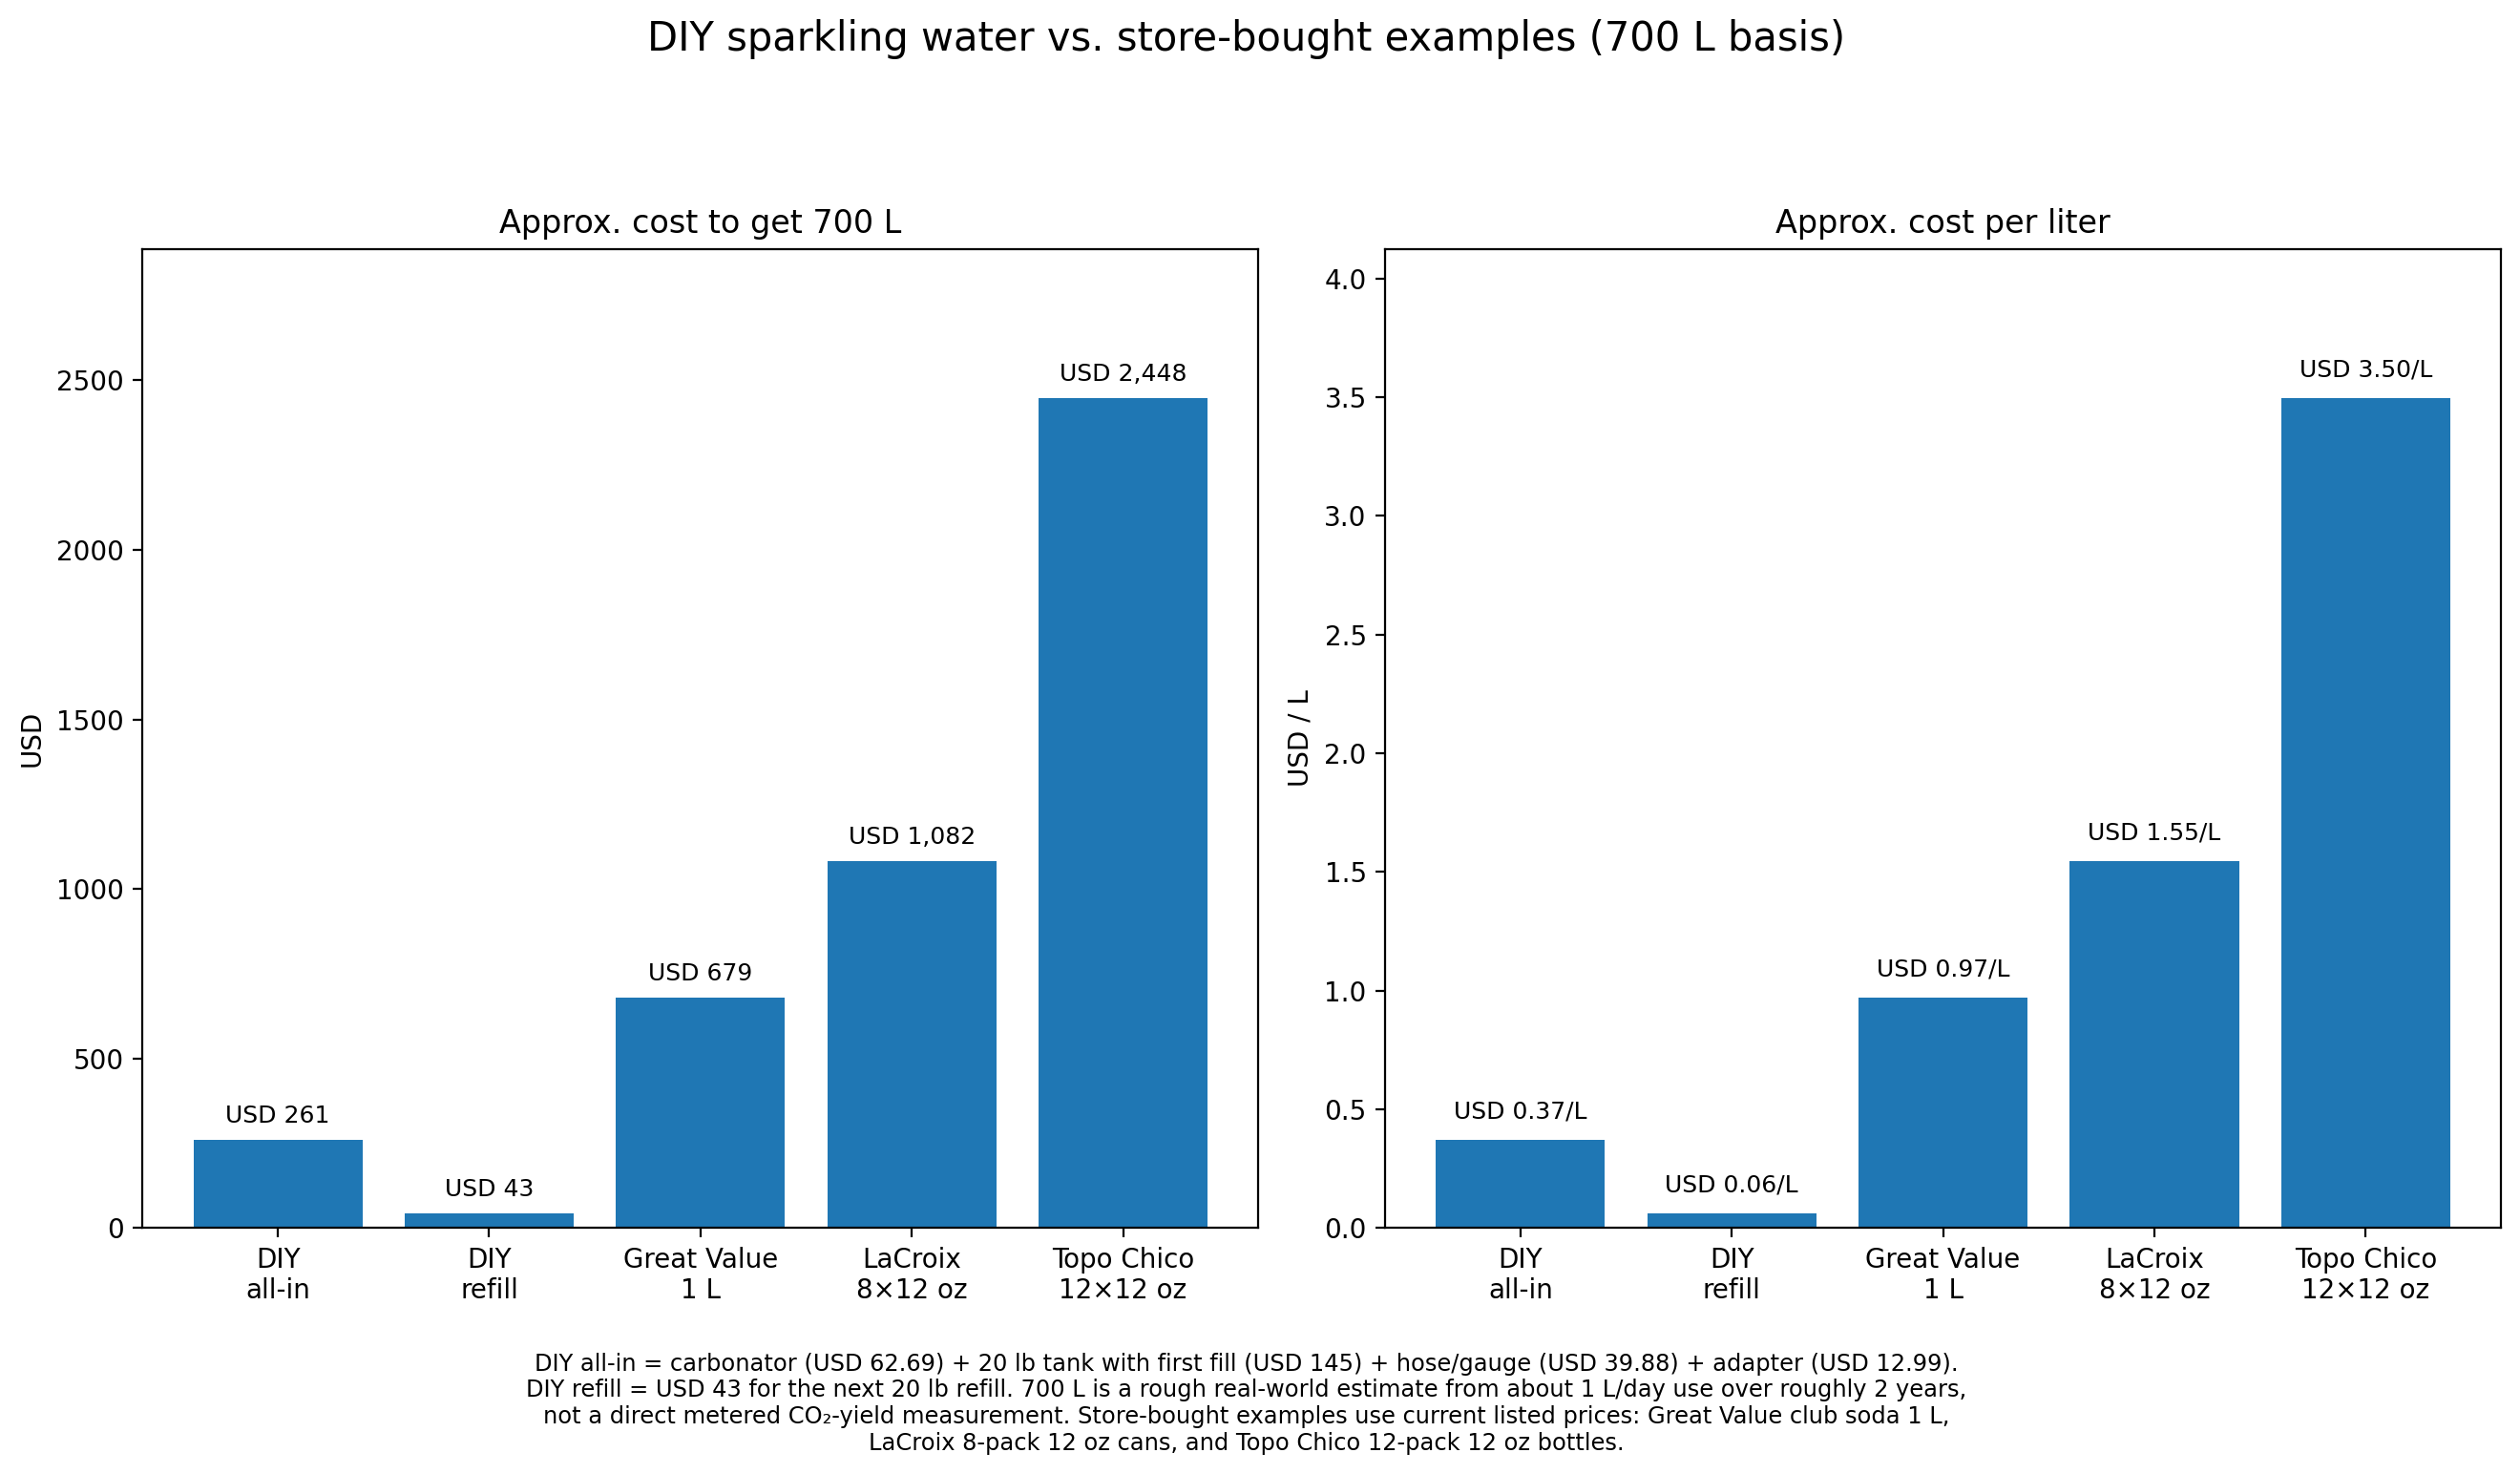
Up to this point, the comparison has focused on the CO₂-supply side. In day-to-day use, though, the more intuitive question is simply: how much sparkling water does this tank actually make? In my own use, it feels like about 1 L per day for roughly 2 years, so I treat one 20 lb fill as roughly 700 L. That is not a direct metered CO₂-yield measurement — it is a real-world estimate from actual use.
For context, SodaStream says its 60 L cylinders make up to about 60 L on average, while also noting that cylinder life depends on the carbonation level used. [11] A 20 lb tank contains about 22.1 times the CO₂ mass of a 410 g SodaStream cylinder, so a simple “60 L per cylinder” upper-bound calculation gives roughly 1,330 L. My rough real-world estimate of 700 L is about 53% of that figure. Because I normally carbonate quite strongly, and this setup also loses some CO₂ through headspace, relief-valve venting, connections and opening, I do not consider 700 L an implausible real-world number. Still, it is an estimate from use, not a directly measured tank-yield test.
On that 700 L basis, this DIY setup works out to about $0.37/L all-in, or about $0.06/L once I am only paying for the next CO₂ refill. By comparison, examples of store-bought sparkling water come out to $0.97/L for Walmart Great Value club soda, about $1.55/L for LaCroix 8-packs, and about $3.50/L for Topo Chico 12-packs. [8][9][10]
| 700 L basis | Approx. total cost | Approx. unit cost | Notes |
|---|---|---|---|
| DIY all-in | $260.56 | $0.37/L | Carbonator + first 20 lb setup + connection hardware |
| DIY refill | $43.00 | $0.06/L | After the tank is already owned |
| Great Value Club Soda 1 L | about $679 | $0.97/L | Budget store-brand example |
| LaCroix 8×12 oz | about $1,082 | about $1.55/L | Flavored sparkling water example |
| Topo Chico 12×12 oz | about $2,448 | about $3.50/L | Premium sparkling mineral water example |
In other words, even against the cheapest store-brand club soda, the DIY route is already cheaper by the time I have made about 700 L on the first fill. Once the 20 lb tank is owned, the gap widens further. I am not including tap-water cost, tax, or shipping here, but those additions would not change the overall direction very much.
2. The key hardware feature: removing the bottle without releasing the pressure
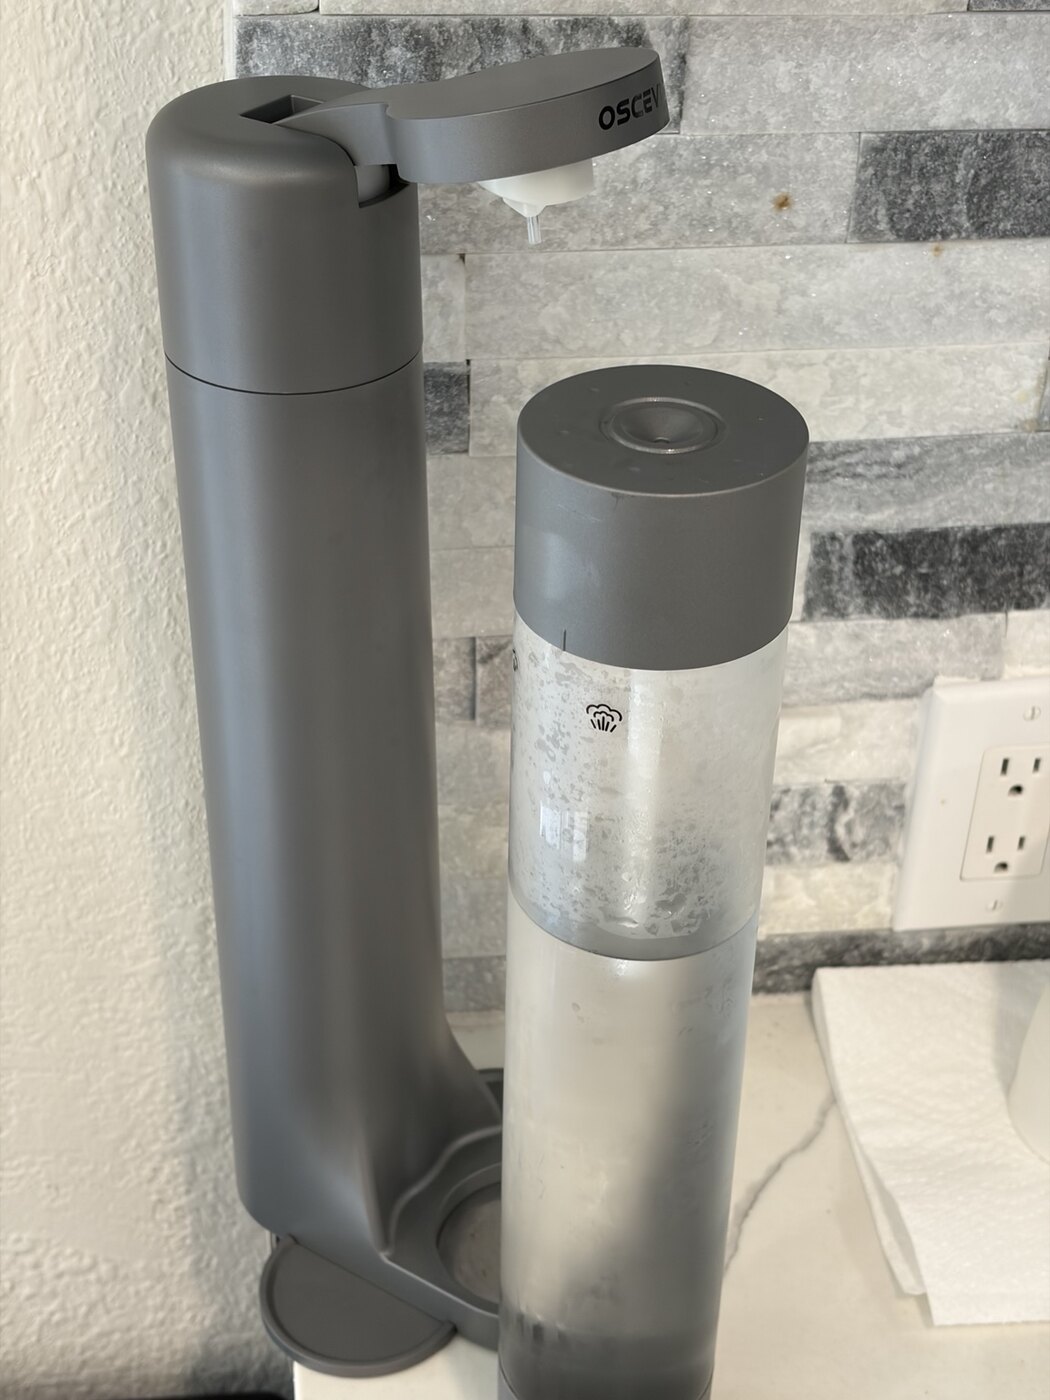
This feature is what made the timing experiment possible. After injecting CO₂, I can remove the bottle with the infuser cap still attached, then let it sit for 1 minute, 15 minutes, 80 minutes or overnight without intentionally venting the headspace.
With the more conventional SodaStream-style arrangement I used before, I could not simply remove a bottle and park it elsewhere while preserving that same pressurized state. So this machine did more than save money: it let me make pressurized hold time an experimental variable.
3. First clue: the 1-minute sample looked wild, but tasted weakest
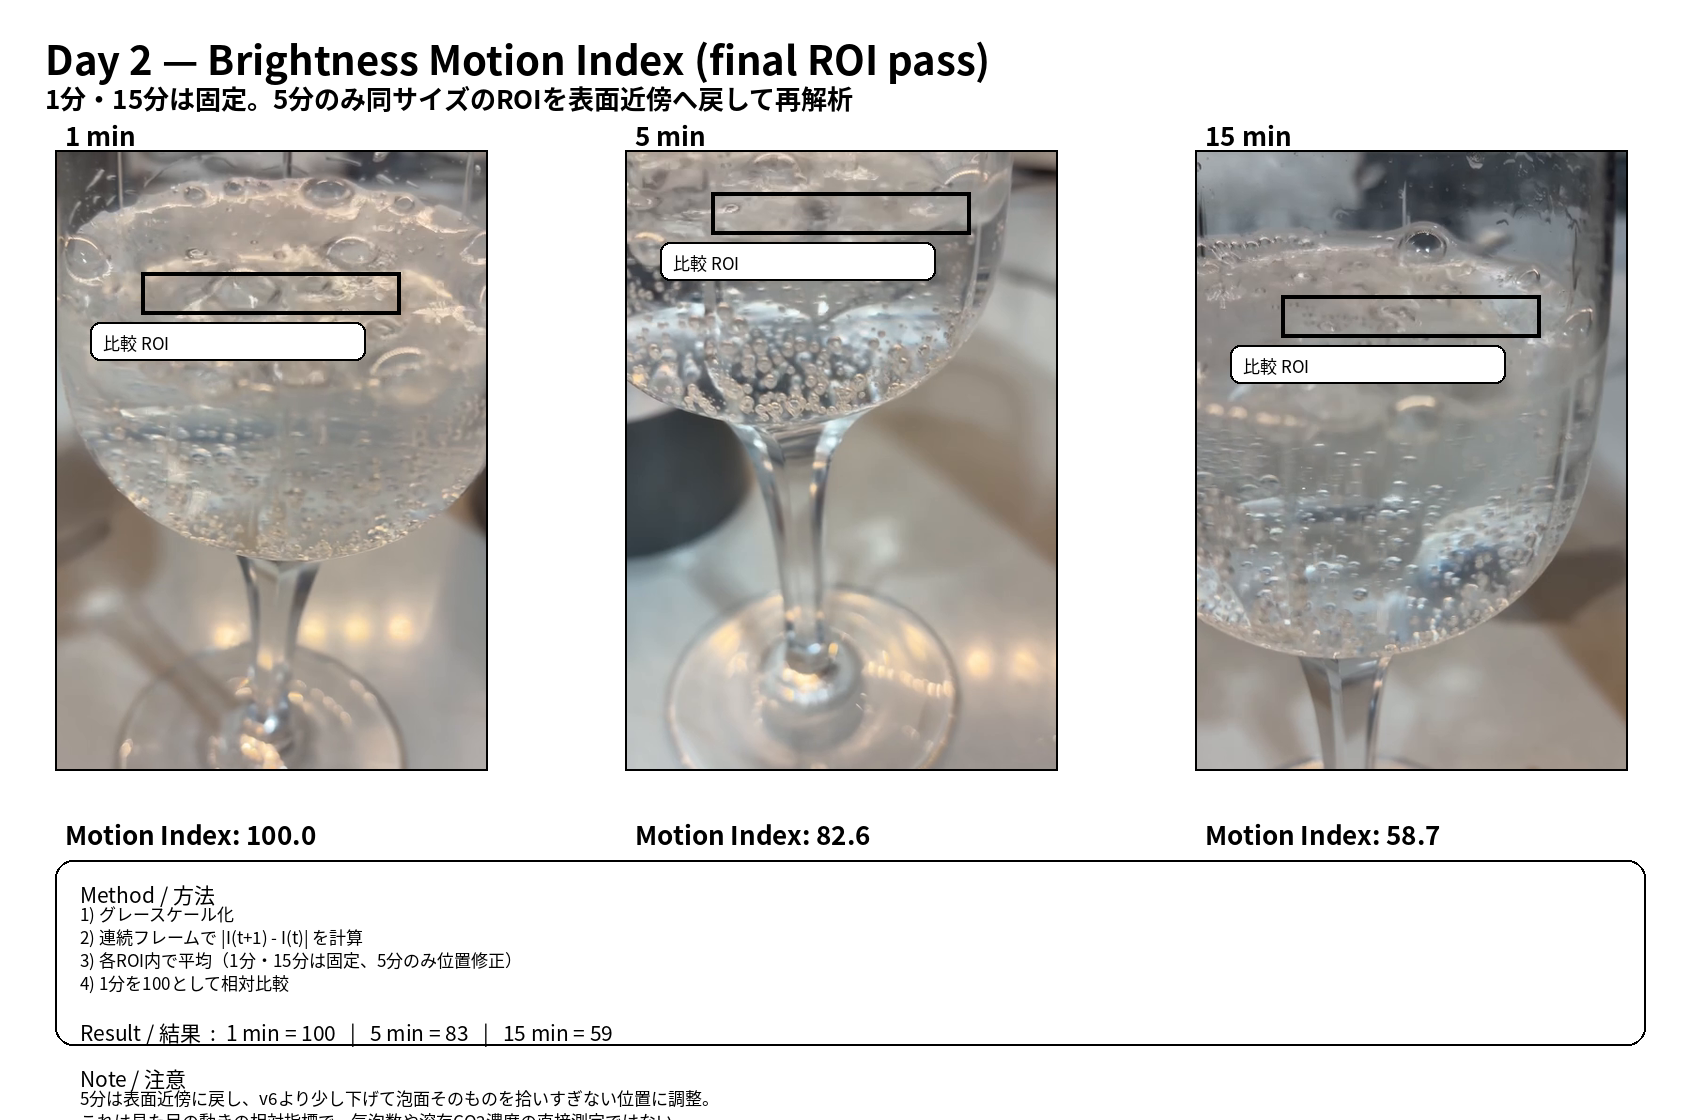
I first tested 1, 5 and 15 minutes of pressurized hold time after the same carbonation procedure. The sensory result was straightforward: 1 minute felt weakest and faded fastest, 5 minutes was in between, and 15 minutes felt strongest and lasted longest. Visually, though, the order looked almost backwards: the 1-minute sample foamed the most dramatically.
1 / 5 / 15 minutes shown side by side.
To quantify the visual behavior, I converted the glass-side videos to grayscale and averaged the frame-to-frame brightness difference, |I(t+1)-I(t)|, inside a near-surface region of interest. This “Motion Index” is not a bubble count and it is not dissolved CO₂; it is simply a relative measure of visible motion.
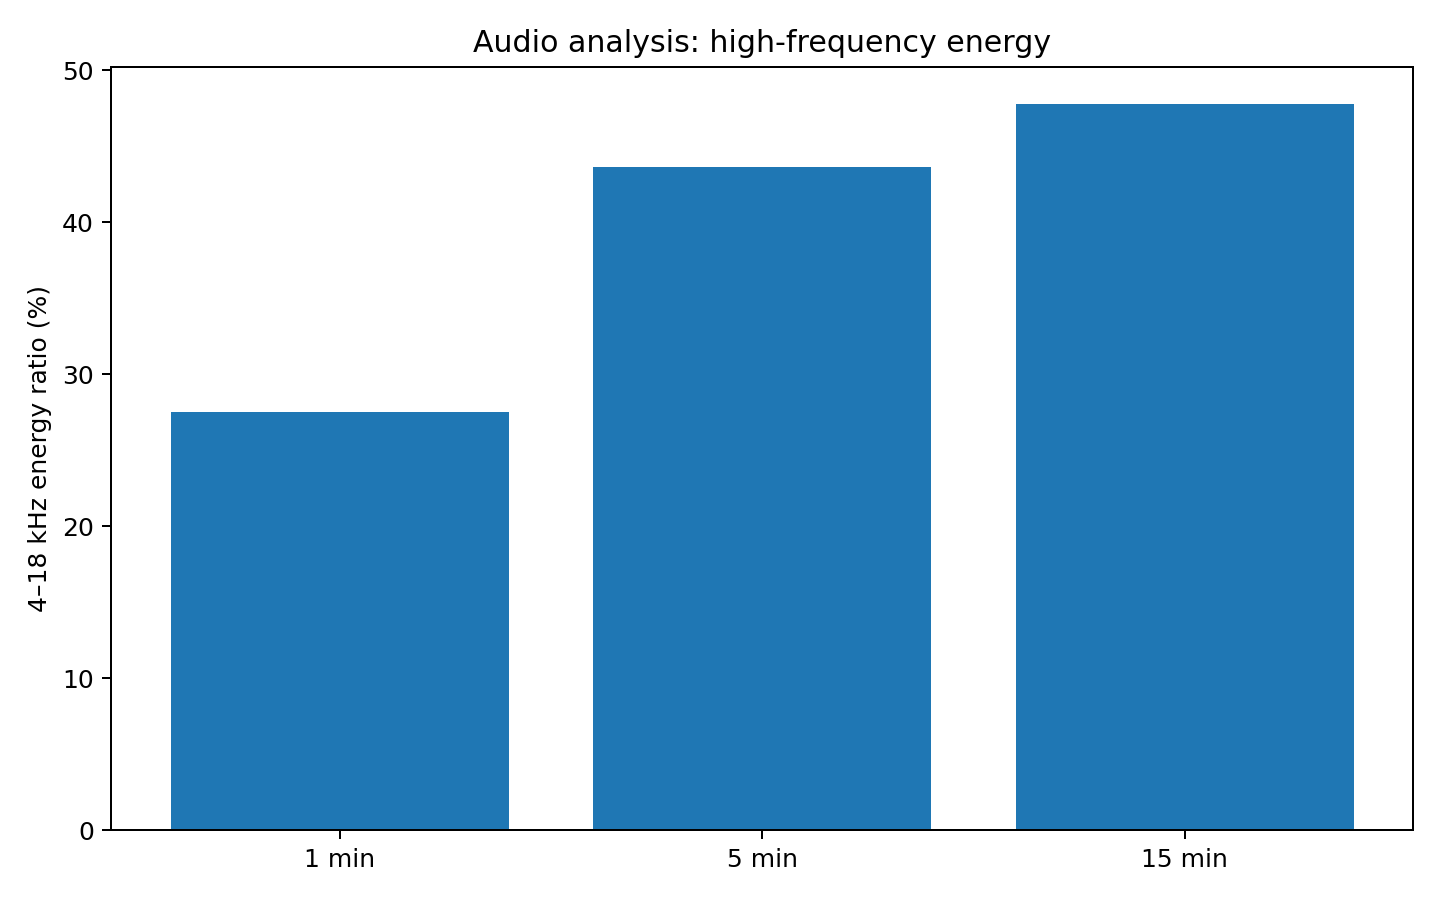
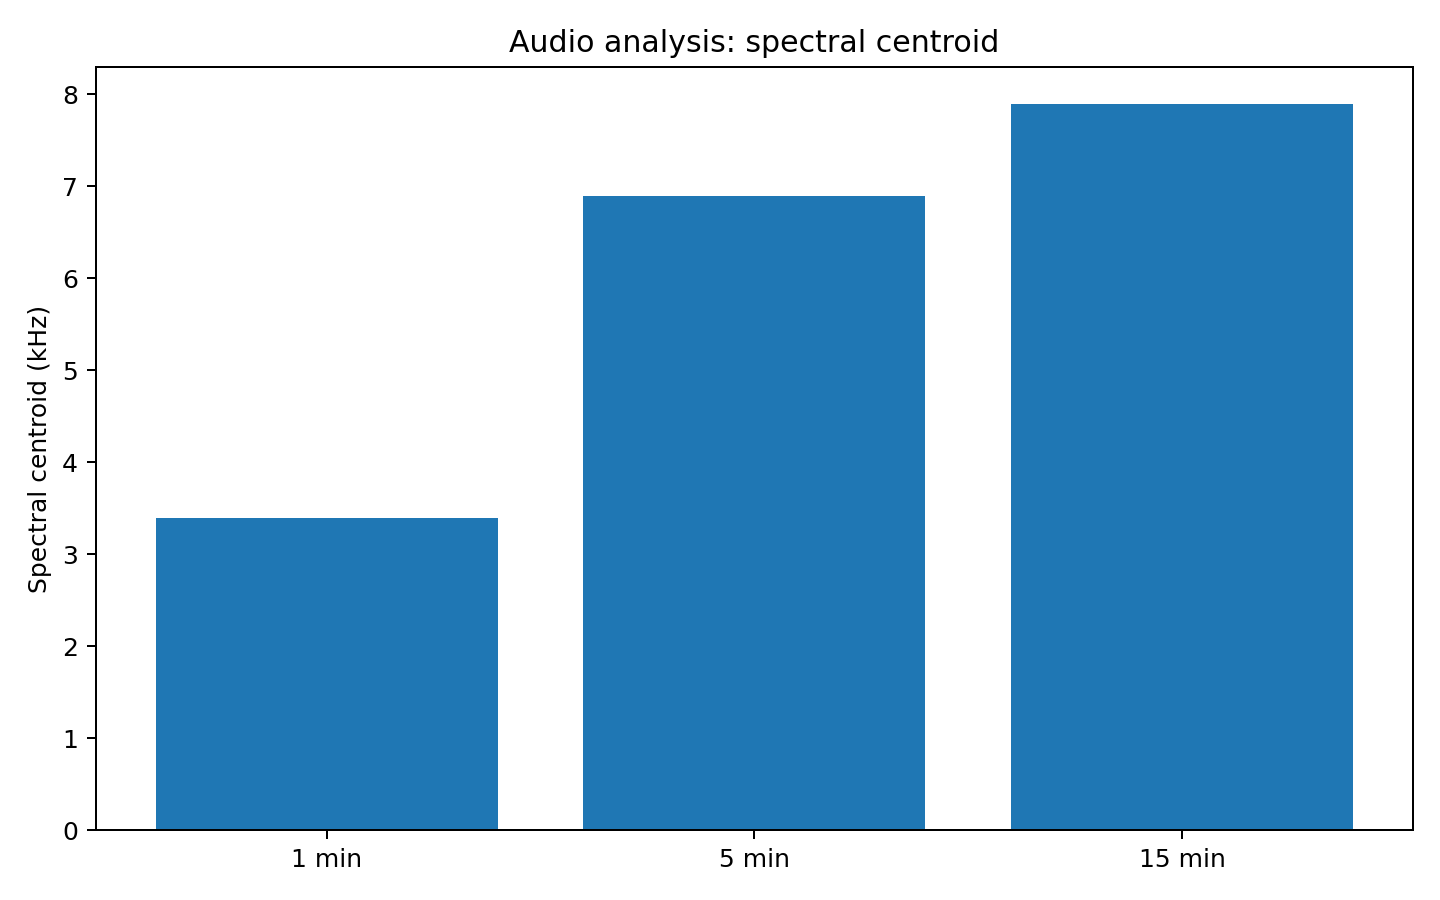
The audio changed too. The 4–18 kHz energy ratio moved from 27.5 → 43.6 → 47.8%, while spectral centroid shifted from 3.4 → 6.9 → 7.9 kHz. That is consistent with a change in bubble-event character, but the recordings also contain valve noise, surface effects and container resonance, so I treat these only as relative acoustic fingerprints.
4. Could a 0.1 g kitchen scale see the difference?
One volume of CO₂ corresponds to roughly 1.96 g of CO₂ per liter of liquid when the gas volume is referenced to standard conditions. For 800 mL (27 fl oz), that is about 1.57 g per volume. So a 0.1 g scale has enough nominal resolution to see meaningful relative differences.
Simply weighing a sealed bottle before and after carbonation does not separate dissolved CO₂ from gas in the headspace. Instead, I compared the stable mass before opening with the stable mass after opening and degassing had settled down.
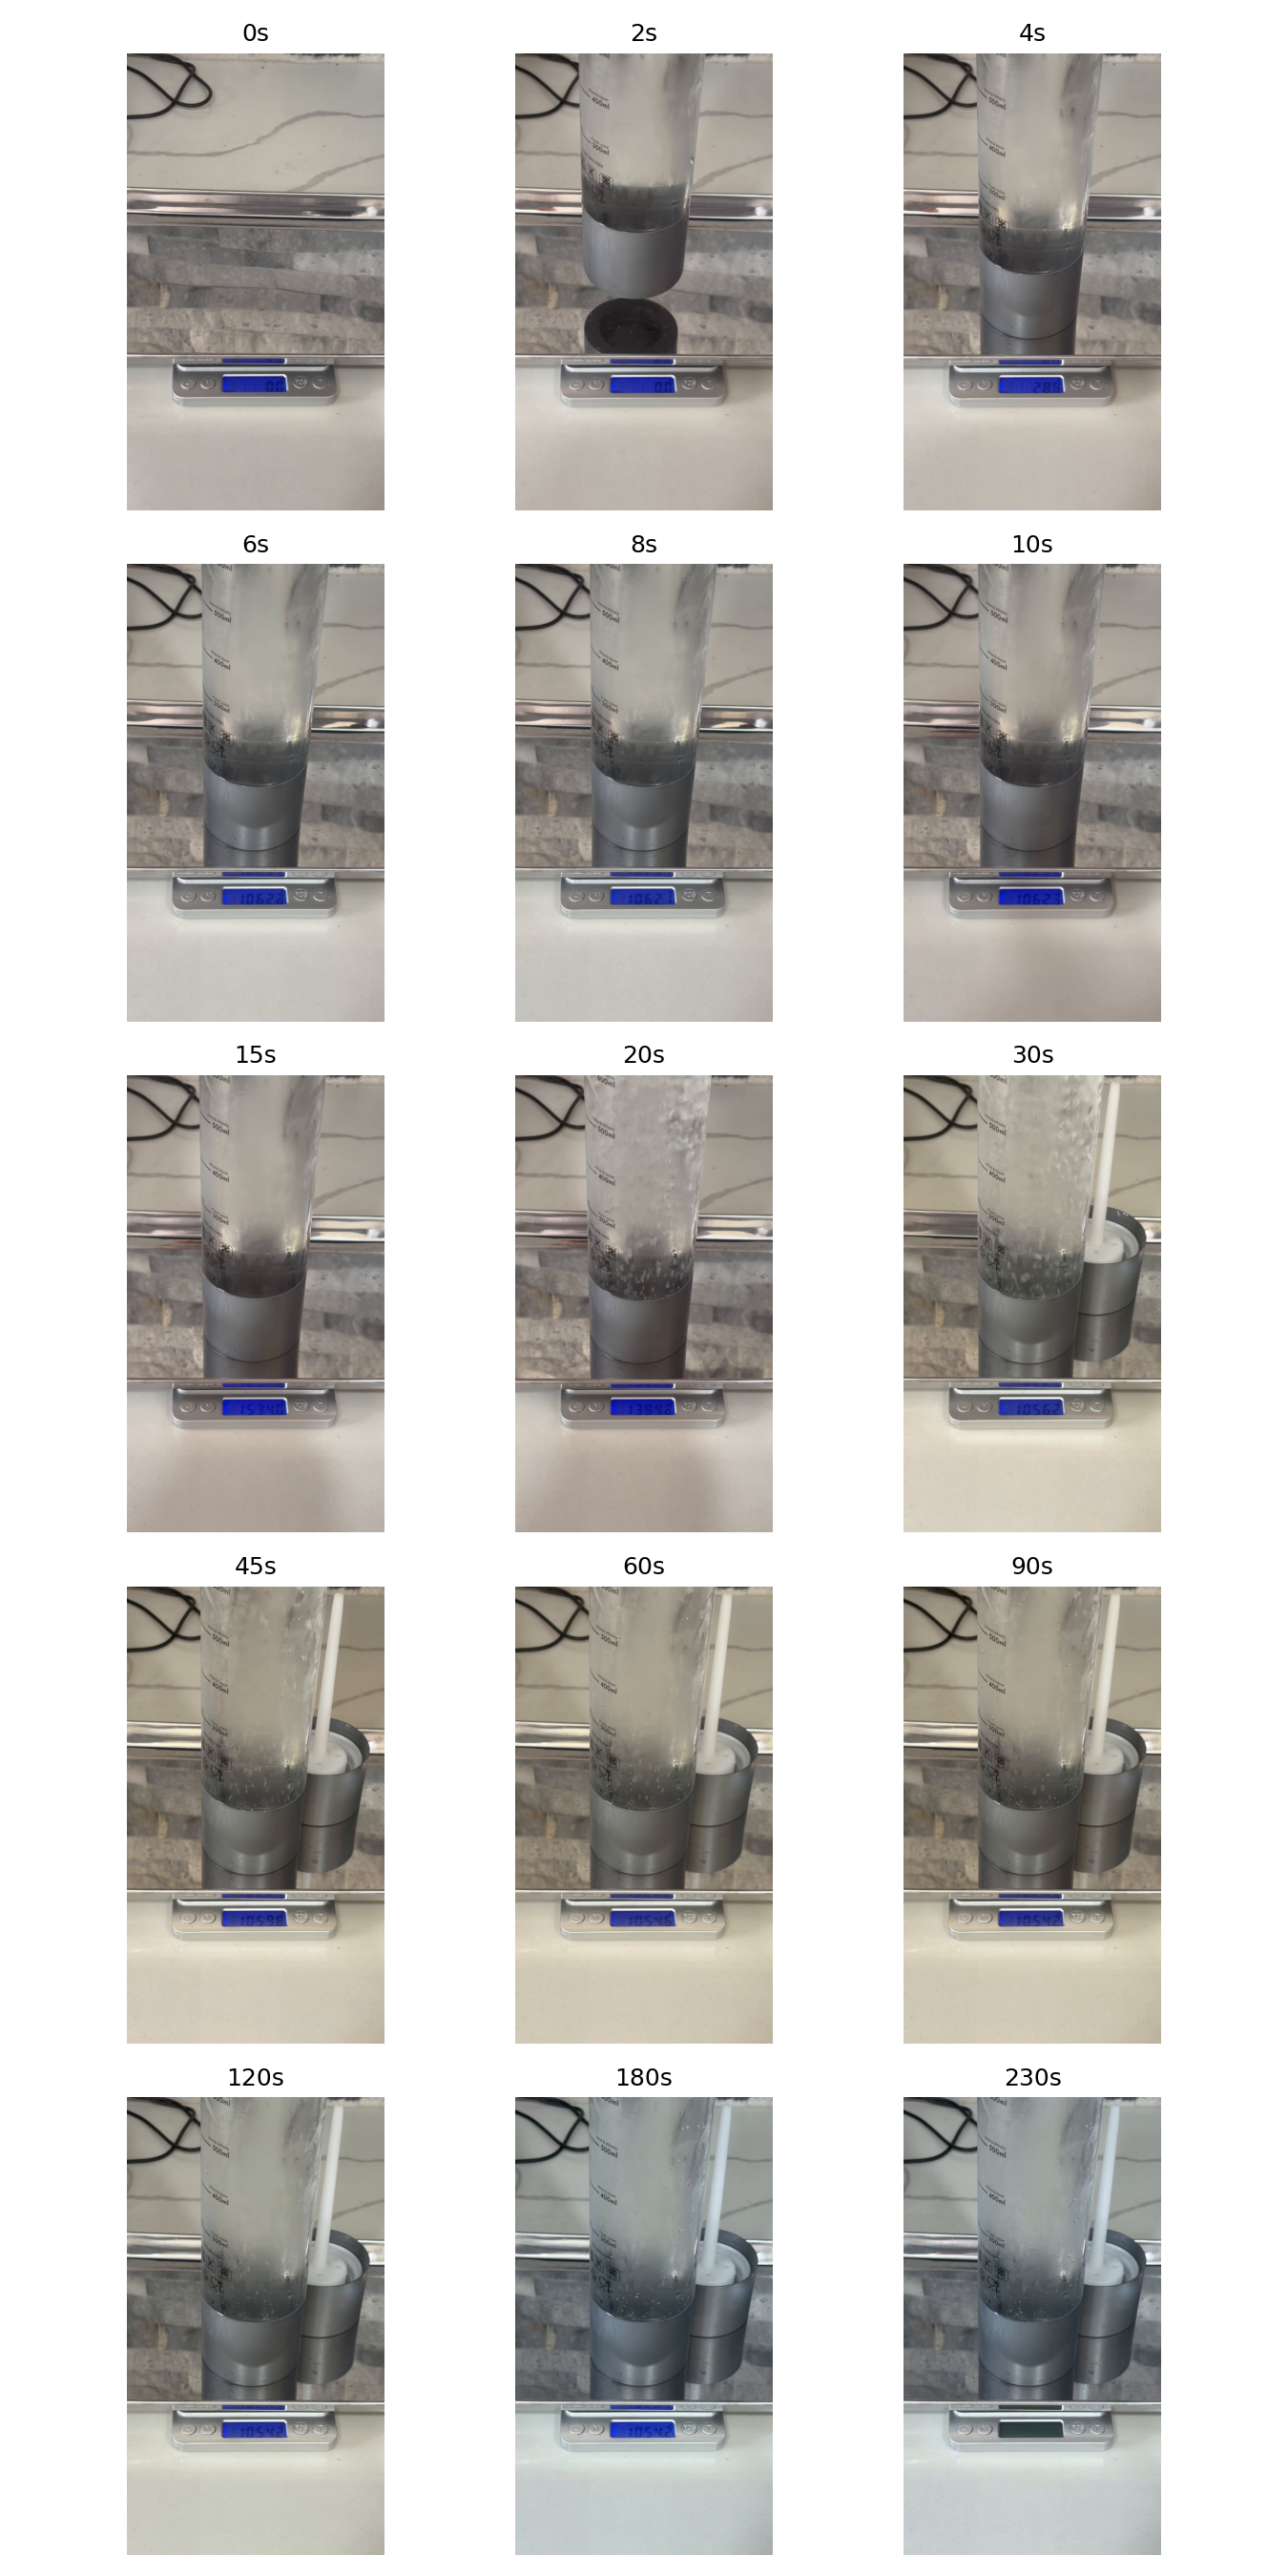
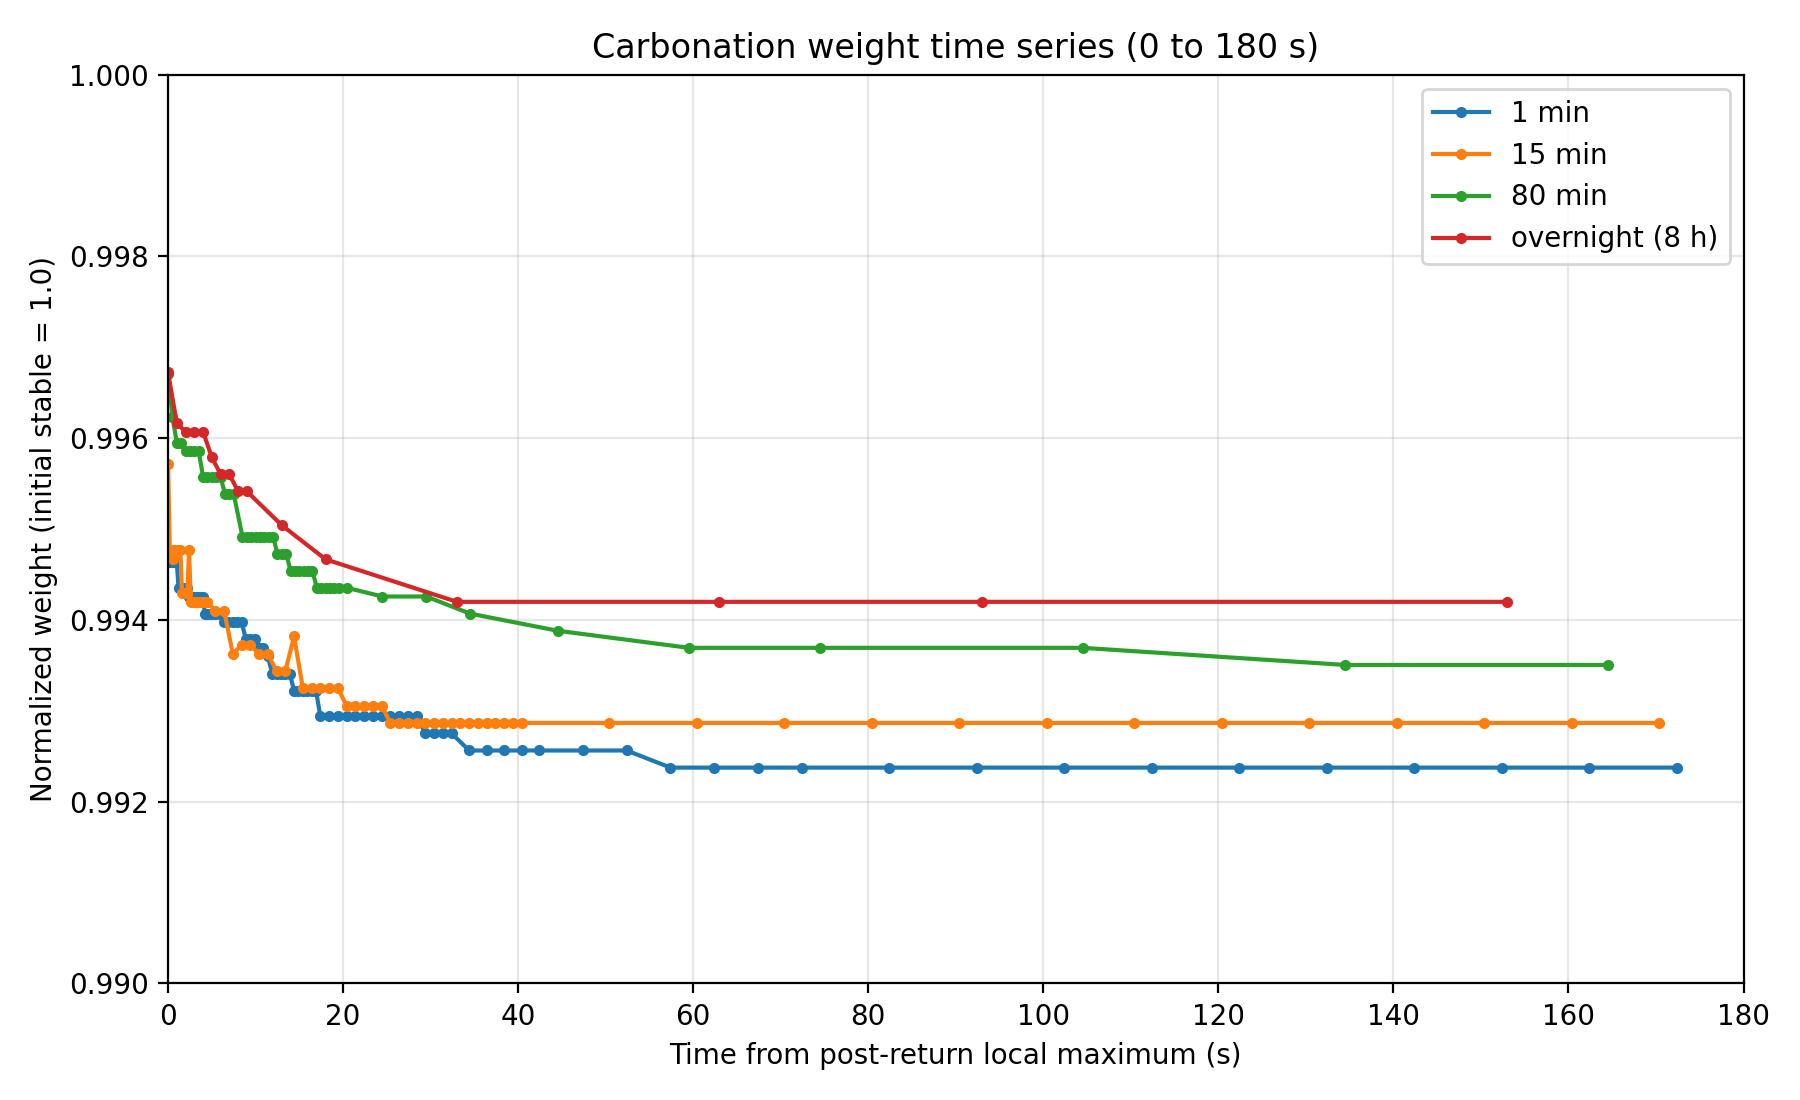
The lost mass can include headspace CO₂, dissolved CO₂ that degassed, droplets/condensation and handling differences. This is therefore not a direct measurement of dissolved CO₂ concentration. It is a controlled relative comparison using the same 800 mL fill and the same procedure.
5. 1 minute vs. 15 minutes vs. 80 minutes vs. 8 hours
Once 15 minutes and overnight were clearly different, the useful missing point was somewhere between them. I chose 80 minutes because it sits near the middle of 15 minutes and 8 hours on a logarithmic time scale. The hold temperature for this set was 0°C (32°F).
| Pressurized hold | Mass lost from pre-open stable to final stable | Difference vs. 1 min |
|---|---|---|
| 1 min | 8.1 g | baseline |
| 15 min | 7.5 g | 0.6 g less |
| 80 min | 6.9 g | 1.2 g less |
| 8 h | 6.2 g | 1.9 g less |
The 8-hour sample still lost 1.3 g less than the 15-minute sample. After the measurement sequence, the taste impression lined up with the same direction: overnight still felt strongly carbonated, 15 minutes was moderate, and 1 minute was noticeably weak.
6. The fit gives τ≈74 minutes. My practical answer is about four hours.
Fitting the four points to an exponential relaxation toward a non-zero asymptote gives:
L(t) ≈ 6.22 + 1.79 · exp(−t / 74.2)
τ ≈ 74.2 min, R² ≈ 0.974
Here, L(t) is the measured mass loss after opening, not dissolved CO₂ concentration itself. Also, this is a three-parameter fit to only four measured hold times, so I do not treat the high R² by itself as proof that the model is uniquely correct. I also tried an empirical logarithmic fit during the analysis, but I use exponential relaxation here because it maps naturally onto a standard gas–liquid equilibration model.
If the measured loss is acting as a proxy for how far the closed bottle remains from gas–liquid equilibrium, a standard lumped gas–liquid mass-transfer model has the same form:
dC/dt = kLa(C* − C)
C(t) = Ceq − A·exp(−t/τ)
The 74-minute value is therefore best described as an effective time constant for this particular setup: 0°C water, 800 mL, this tall bottle, this headspace/interface, the initial mixing from CO₂ injection, and whatever slow internal circulation remains during the hold.
Fifteen minutes is enough to make a drink that clearly feels carbonated, but it was not close to the long-rest behavior in this test. For a “mostly settled” target, 3τ ≈ 3 h 40 min — call it about four hours. If timing is not important, overnight is the simplest answer.
The order of magnitude is not strange for small-scale forced carbonation. University of Florida IFAS gives an example where water can take hours to reach full carbonation and notes that agitation can greatly accelerate the process. [4] A 2024 review of CO₂ diffusivity in water also emphasizes the strong temperature dependence of molecular transport and covers data down to about 273 K. [5]
Technical note: why might the short-rest samples degas so violently?
I find it useful to separate the pressurized hold from the opening event.
- During the hold: immediately after injection, the closed bottle may still contain more CO₂ in the headspace and in undissolved microbubbles than it will at equilibrium. Over time CO₂ redistributes into the liquid.
- At opening: pressure drops rapidly, leaving the liquid supersaturated relative to atmospheric pressure.
- Short rest: residual microbubbles and gas pockets can provide nucleation sites, so the decompression creates rapid visible bubbling and CO₂ loss.
- Long rest: if those microbubbles/nuclei have diminished and more CO₂ has moved into solution, the opening can look calmer while the drink retains more carbonation.
Single-bubble experiments show that liquid-side CO₂ mass transfer depends on bubble size and exposure time, which is another reason not to treat “bubbly appearance” and bulk equilibration as the same thing. [6] I did not directly measure microbubble count or nucleation-site population here, so this part remains a mechanistic hypothesis consistent with the video and mass-loss behavior.
7. Topo Chico tasting: same “strong carbonation,” very different feel
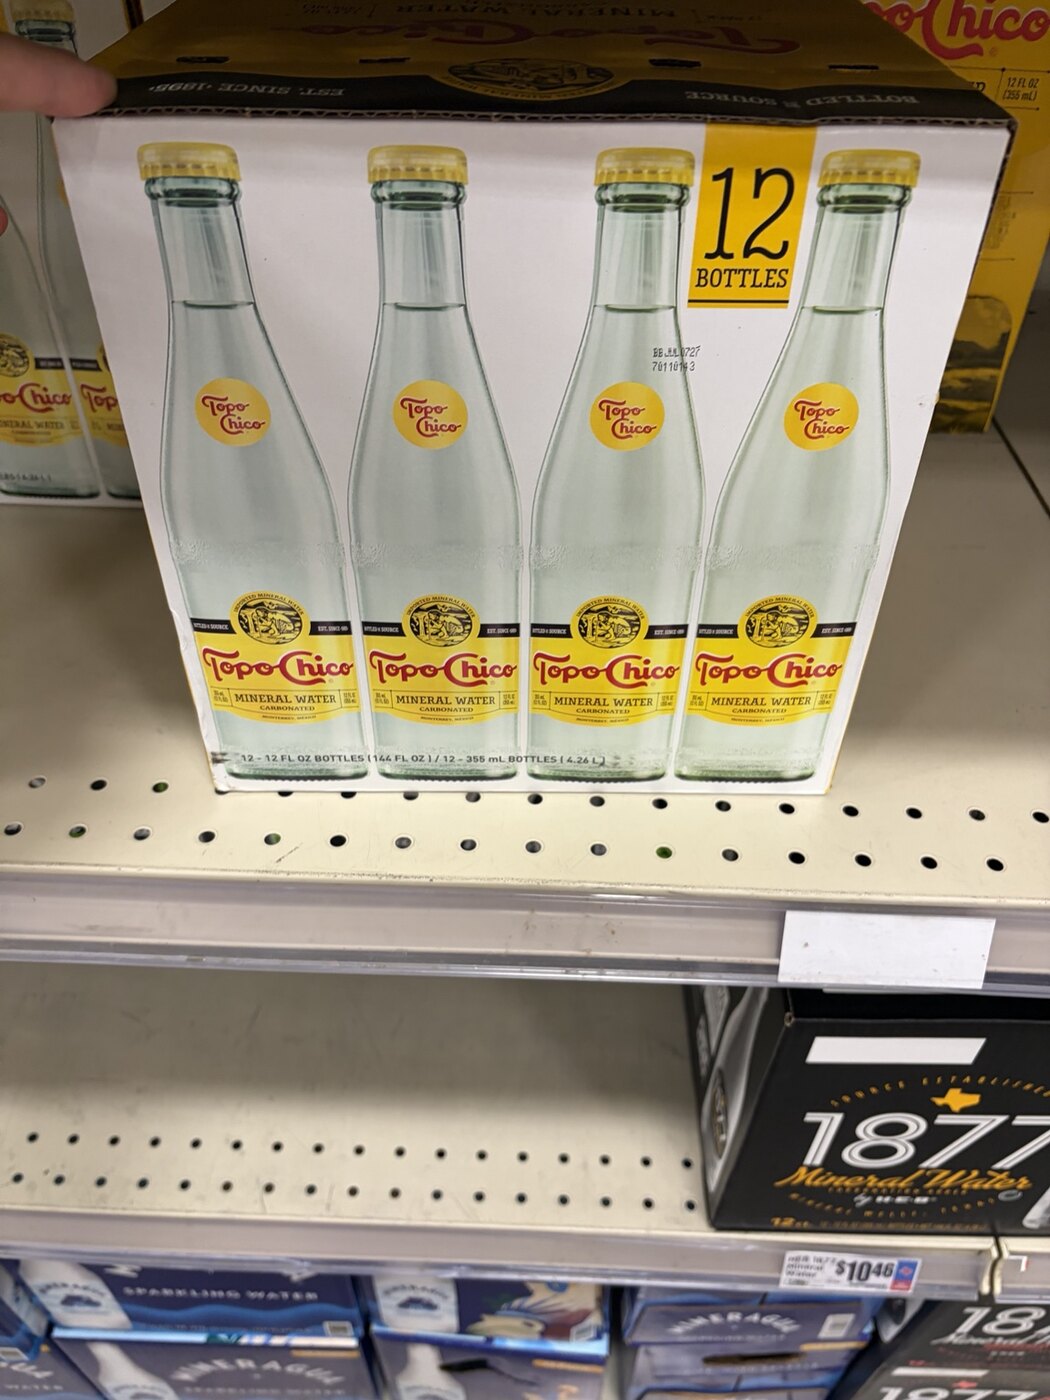
While I was running this test, Topo Chico Mineral Water began a phased return to Texas after being difficult to find for months in 2026. Houston-area H‑E‑B and other retailers were among the stores reported to be restocking it. [7] That made it a perfect real-world benchmark.
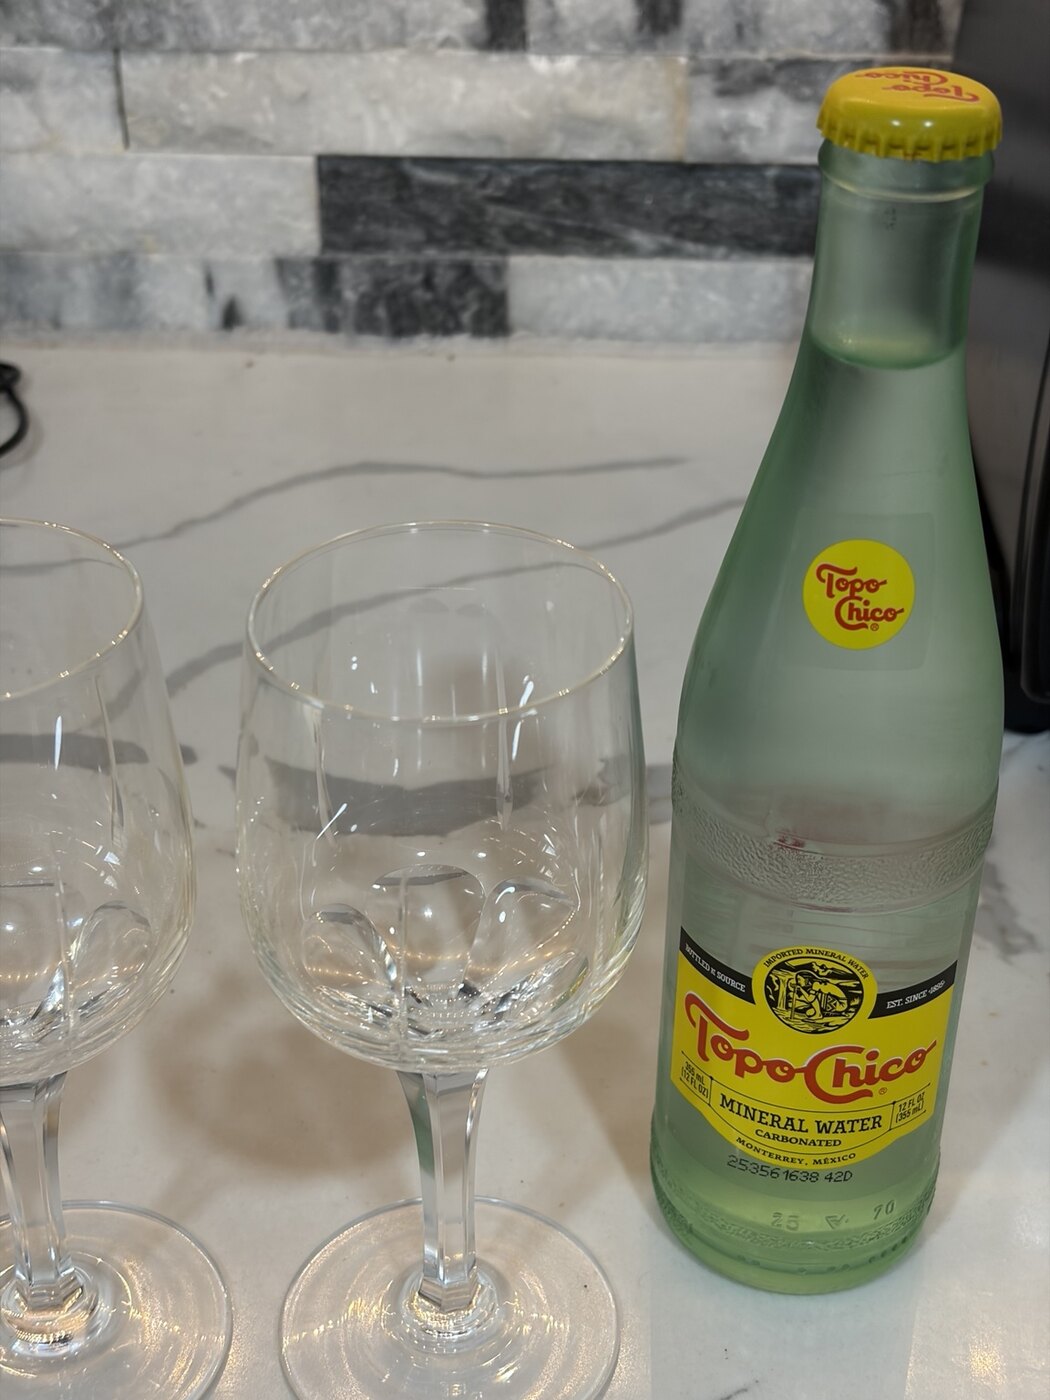
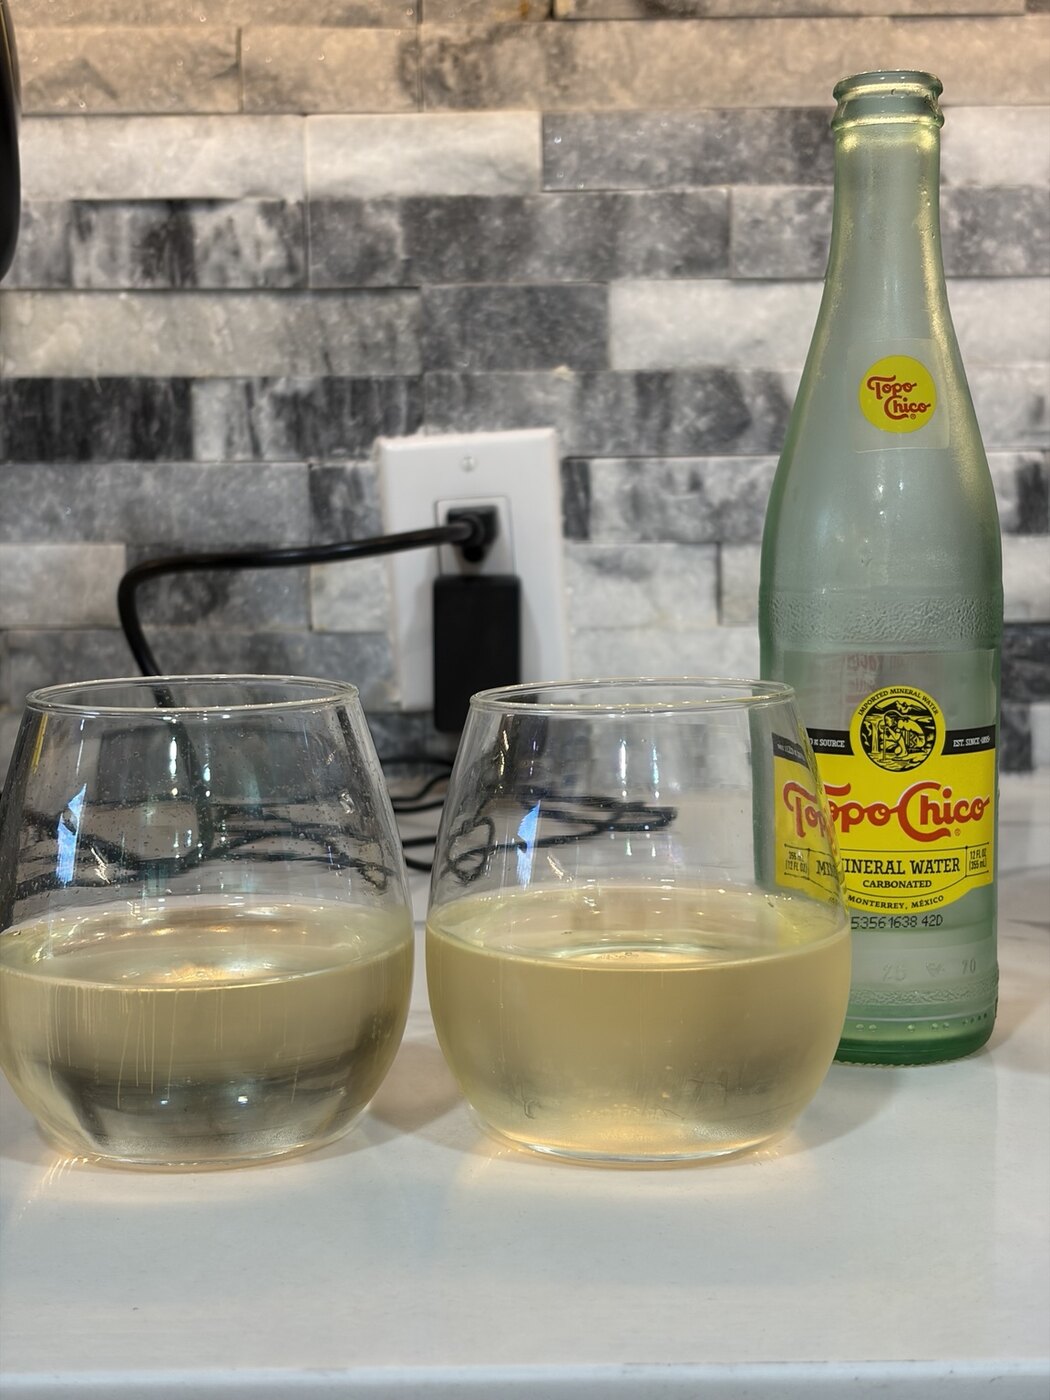
Plain
- DIY: stronger overall carbonation, sharper acidity.
- Topo Chico: still strongly carbonated, but the bubbles felt finer and smoother; the flavor was mellower with less sharp acidity.
Plain-water comparison. I intentionally left the left/right glasses unlabeled in the video rather than guessing from the visual alone.
Highball
I also made two highballs with Dewar's 12 Mizunara. Topo Chico felt finer and more delicate but gave me a slight bitter note. The DIY water had very similar carbonation strength, and its sharper acidity worked well with the whisky and made the sweetness easier to notice. I preferred the DIY version in this round.
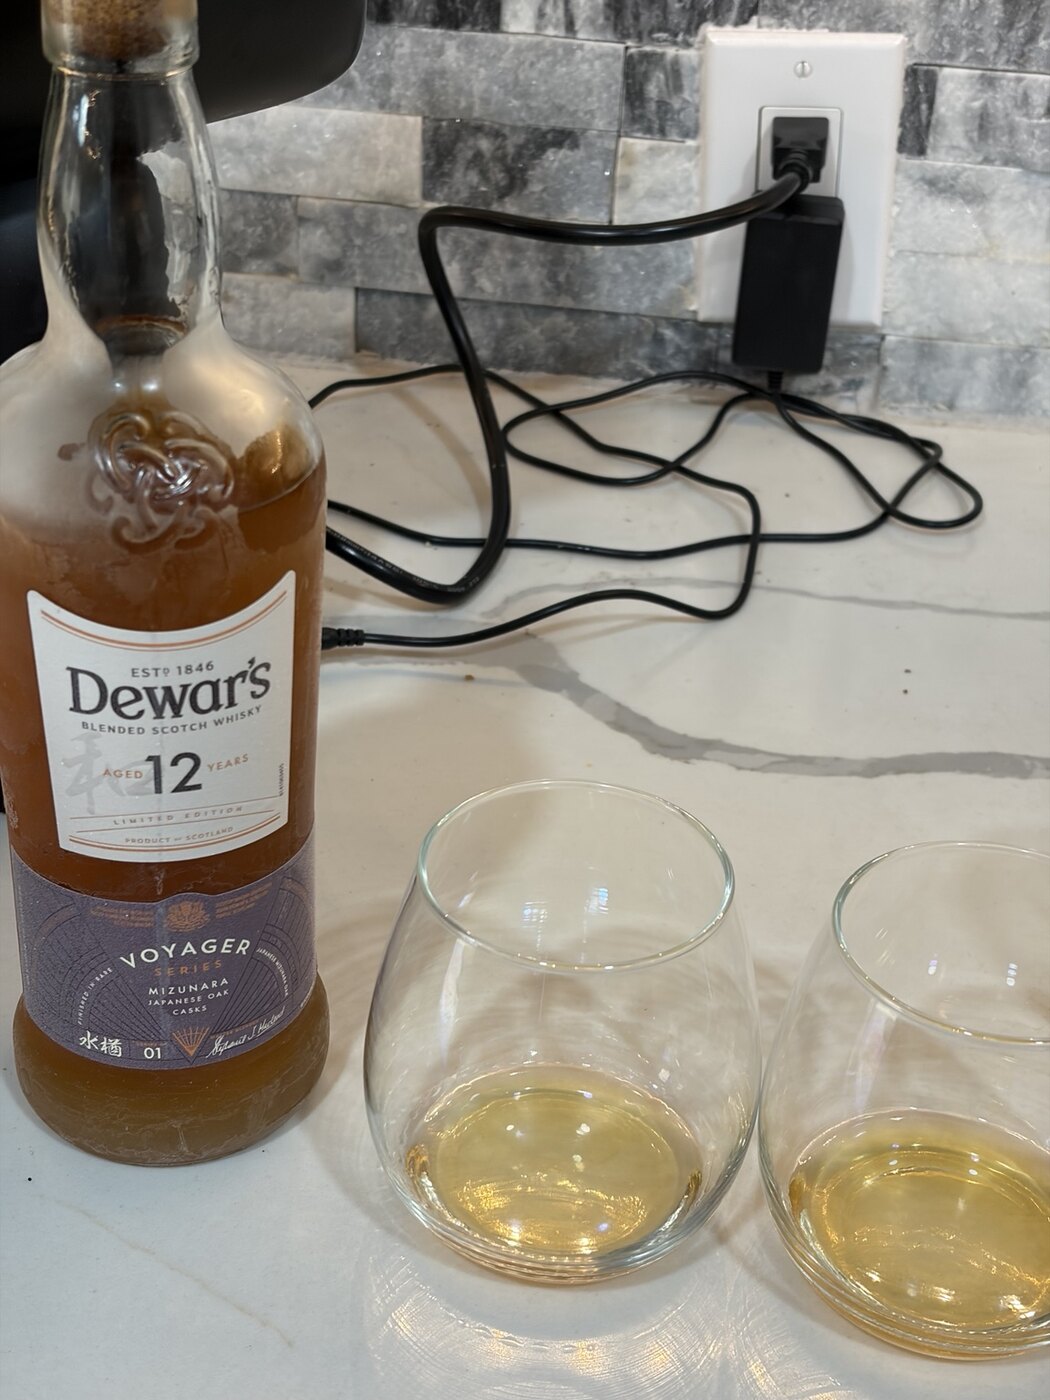
Topo Chico is a mineral water, while my DIY water starts with a different water source. Mineral composition can affect acidity, bitterness and mouthfeel, so this section is a tasting of the finished drinks — not proof that one carbonation method is inherently better.
8. Bottom line: 20 lb for cost, ~4 hours for retention
- Even including my used tank, the initial CO₂ charge and the connection hardware, the first ~20 lb of CO₂ still cost less than getting the same CO₂ mass through one SodaStream spare plus one-time exchanges.
- In my real-world use, one 20 lb fill feels like roughly 700 L of sparkling water, which works out to about $0.37/L all-in or about $0.06/L once I am only paying for the next refill.
- That means the DIY route is already cheaper than budget store-brand club soda by the first 700 L, and dramatically cheaper than premium sparkling water like Topo Chico.
- The removable pressurized infuser cap is what made hold time testable in the first place.
- The 1-minute sample looked the most violent on opening but tasted the weakest afterward; visible fizz was not the same thing as retained carbonation.
- Measured mass loss fell from 8.1 g → 7.5 g → 6.9 g → 6.2 g for 1 min → 15 min → 80 min → 8 h.
- The effective exponential time constant was ~74 minutes; 3τ≈3 h 40 min, so about four hours is my practical target.
- If I do not want to think about timing, I leave it overnight.
- Topo Chico remained the smoother, finer-bubble drink, while the DIY version was sharper and — in this highball test — my preference.
What started as a cost-saving project ended up connecting CO₂ economics, gas–liquid equilibration, opening losses and tasting. The next useful step would be repeated runs under the same conditions, ideally with pressure and temperature logged at the same time.
References
- SodaStream USA, CO₂ cylinder refill / exchange / spare (one-time exchange $16.99, spare $31.99; accessed Oct. 8, 2026).
- SodaStream, 60 L gas cylinder product specification (CO₂ content approx. 410 g / 14.5 oz).
- CMR Carbonics, CO₂ cylinder refills in Houston / 20 lb cylinder sales and refills (food-quality CO₂ and in-person refills).
- University of Florida IFAS Extension, A Guide to Carbonating Beverages at Small Scale (forced carbonation can take hours; agitation greatly increases the rate).
- Polat, H. M. et al., Diffusivity of CO₂ in H₂O: A Review of Experimental Studies and Molecular Simulations in the Bulk and in Confinement, Journal of Chemical & Engineering Data 69 (2024), 3296–3329.
- Chemical Engineering Science, Experimental study of interfacial mass transfer from single CO₂ bubbles ascending in stagnant water, 287 (2024), 119684.
- Houston Chronicle, Topo Chico mineral water is returning to Houston-area stores (Oct. 3, 2026).
- Walmart, Great Value Low Sodium Club Soda Sparkling Water, 33.8 fl oz Bottle ($0.97; accessed Oct. 9, 2026).
- Target, LaCroix products at Target (8-pack 12 fl oz cans listed at $4.39; accessed Oct. 9, 2026).
- Target, Topo Chico Mineral Water - 12pk/12 fl oz Bottle ($14.89; accessed Oct. 9, 2026).
- SodaStream USA Support, How often will I need to replace my SodaStream CO₂ cylinder? (60 L cylinders make up to about 60 L on average; actual cylinder life depends on carbonation level; accessed Oct. 9, 2026).
Questions or comments?
Questions or comments about the cost comparison, carbonation timing, mass-loss method, or the Topo Chico tasting are welcome.
I posted the 1 / 5 / 15-minute comparisons, video analysis and scale tests as the experiment developed.